
AI Kitchen Design and Remodel: Plan Your New Kitchen with AI
AI kitchen design and remodel tools turn one photo of your current kitchen into dozens of photorealistic concepts — new cabinets, counters, backsplash, and flooring — in seconds. A home designs ai assistant works the same way a design consultant would, just without the multi-week wait for the first sketch. Instead of paying for early-stage drawings, you can try on a dozen directions in minutes and only then bring a shortlist to a contractor.

That matters because the kitchen is consistently the most expensive room to remodel, averaging roughly $27,000 per project, and the costliest mistake homeowners make is committing to a style before seeing it applied to their actual space. An AI visualizer removes that risk at the idea stage, before any money goes toward materials or labor.
What AI Kitchen Design and Remodel Tools Do
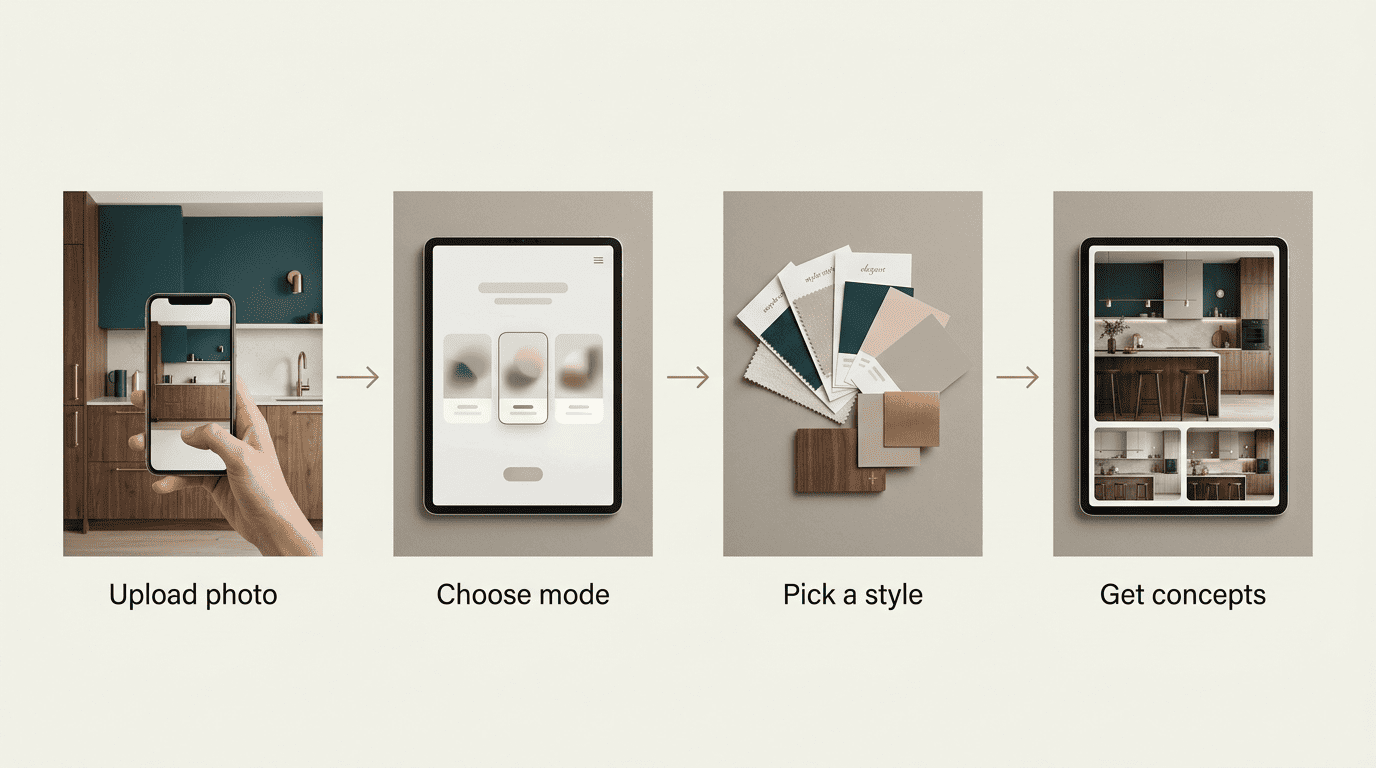
An AI kitchen visualizer works from a single uploaded photo of the existing room. It identifies the cabinet fronts, countertop surfaces, backsplash tile, and flooring as separate zones, then repaints each one according to the style you pick — without touching the layout or the walls behind them.
From one photo to dozens of concepts
The typical flow starts with uploading a photo, then choosing a generation mode:
- Auto — produces quick concepts automatically, no input needed beyond the photo.
- Custom — lets you describe the changes you want in your own words.
- Style Fusion — applies the look of a reference photo you supply to your own kitchen.
From there you pick a design direction — Modern, Scandinavian, Farmhouse, Japandi, Coastal — and the tool renders a photorealistic version of the same kitchen with new cabinets, countertops, backsplash, flooring, and hardware. Most generators cycle through dozens of style variations per photo, which is what makes it practical to compare wood tones, white cabinetry, and mixed finishes side by side before committing to any of them.
What it can and can’t decide
AI visualization is strong at style, material, and mood — it can show you what white oak cabinets or a marble-look counter would actually look like in your room. It cannot tell you whether a wall is load-bearing, whether plumbing or gas lines can move, or what local code requires. Those questions stay with a licensed contractor. Setting that expectation early keeps the render useful as a planning tool rather than a substitute for a site visit.
Getting the Layout Right: The Work Triangle
Good kitchen design still starts with how you move between the three stations you use most, and that principle predates AI tools by decades — it’s a layout rule AI planners now apply automatically when they read a room’s dimensions.
Sink, stove, and refrigerator
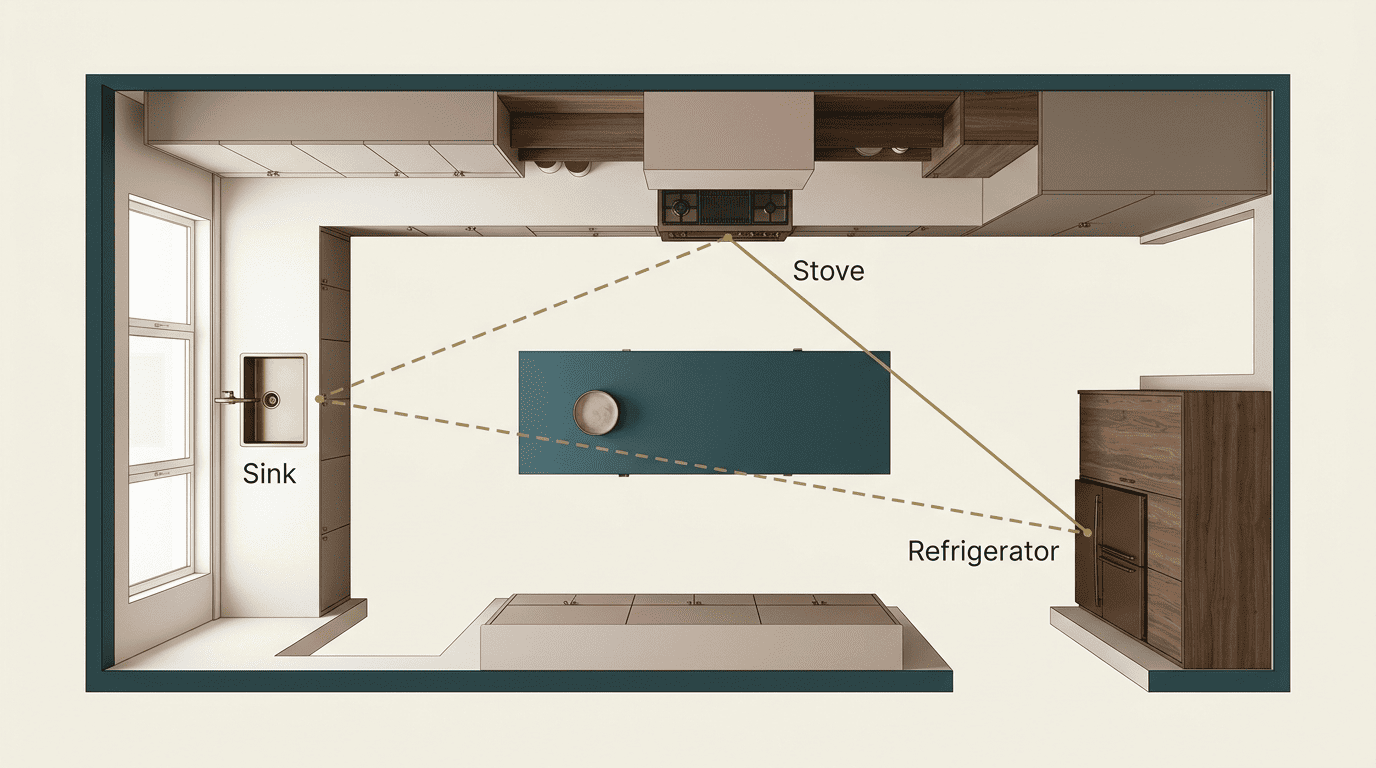
The classic kitchen work triangle connects the sink, stove, and refrigerator, keeping the distance between each pair short enough to work efficiently without crossing paths constantly. The concept was formalized through mid-20th-century kitchen efficiency studies and is documented in detail on Wikipedia’s kitchen work triangle entry. The National Kitchen & Bath Association has since expanded the idea into broader zone-based planning guidelines, but the triangle remains the shorthand most designers still reach for. Some AI kitchen planners detect the room’s dimensions from the uploaded photo and suggest an optimized layout, including where an island could fit without breaking the triangle.
Islands and open-concept
Adding an island or opening a wall into an adjoining living space is one of the most common changes homeowners test through an AI kitchen design tool, because both moves are hard to picture from a floor plan alone. Removing a visual barrier between the kitchen and living room tends to make a compact kitchen feel larger and improves how the space functions for cooking while entertaining, and a render shows that shift immediately rather than asking you to imagine it.
Before testing an island or open-concept render, an AI layout check usually looks at:
- Distance between the sink, stove, and refrigerator
- Clear walkway width around the proposed island
- Whether the fridge and stove sit on the same wall or opposite ones
- How much counter run separates the cooking zone from the prep zone
Choosing Materials: Cabinets, Counters, Backsplash, Floors
Material choice is where an AI kitchen remodel visualizer earns its keep, since swapping a cabinet finish or countertop material across a full photo used to require a physical sample board and a lot of guesswork.
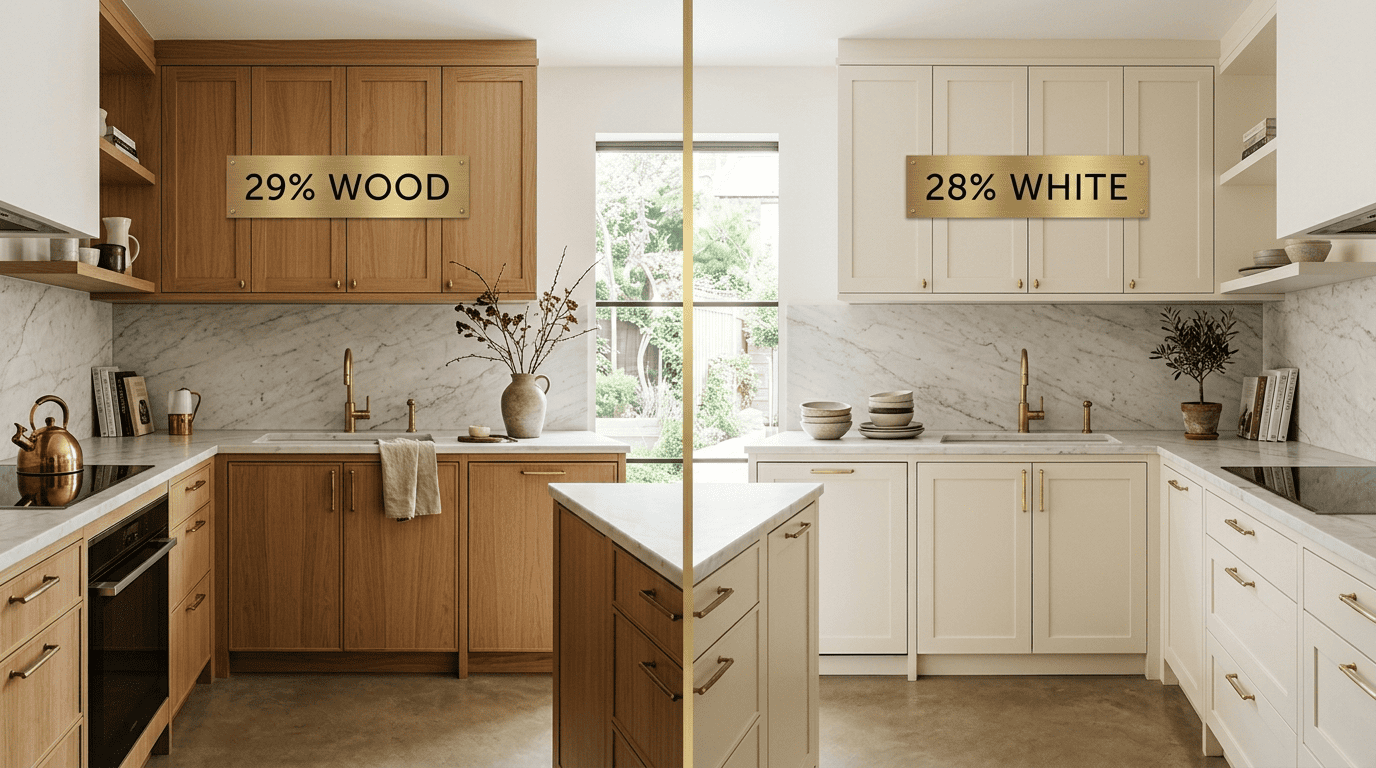
Cabinets are having their biggest color shift in a decade. According to Houzz’s 2026 Kitchen Trends data, wood-tone cabinets edged ahead of white cabinets for the first time in roughly ten years — 29% versus 28% — a reversal after a long stretch of white-cabinet dominance. Within the wood-tone category, white oak is the clear leader, appearing in 51% of professional kitchen specifications tracked by NKBA. A minor remodel typically keeps the existing cabinet boxes in place and replaces only the door fronts and hardware, which is exactly the kind of change an AI render is built to preview before you order anything.
Counters, backsplash, floors
Countertop options run from quartz and granite to soapstone and butcher block, and an AI tool cycles through stone patterns, veining, and edge profiles on the same render so you can compare finishes without ordering slabs. Backsplash tile follows the same logic — subway, zellige, or slab-style panels all get tested against the same cabinet and counter combination. Flooring choices, whether wood, large-format tile, or engineered planks, are rendered last so the whole palette reads as one coordinated design rather than four separate decisions.
A typical materials pass through the tool covers:
- Countertop surface — quartz, granite, soapstone, or butcher block
- Backsplash tile — subway, zellige, or slab-style panels
- Flooring — wood, large-format tile, or engineered planks
- Hardware finish — matte black, brushed brass, or brushed nickel
What a Kitchen Remodel Costs — and the ROI
Seeing a design you like is only half the planning process; knowing what it costs to build is the other half, and the numbers vary more than most homeowners expect.
| Remodel scope | Typical cost | Resale value recouped |
|---|---|---|
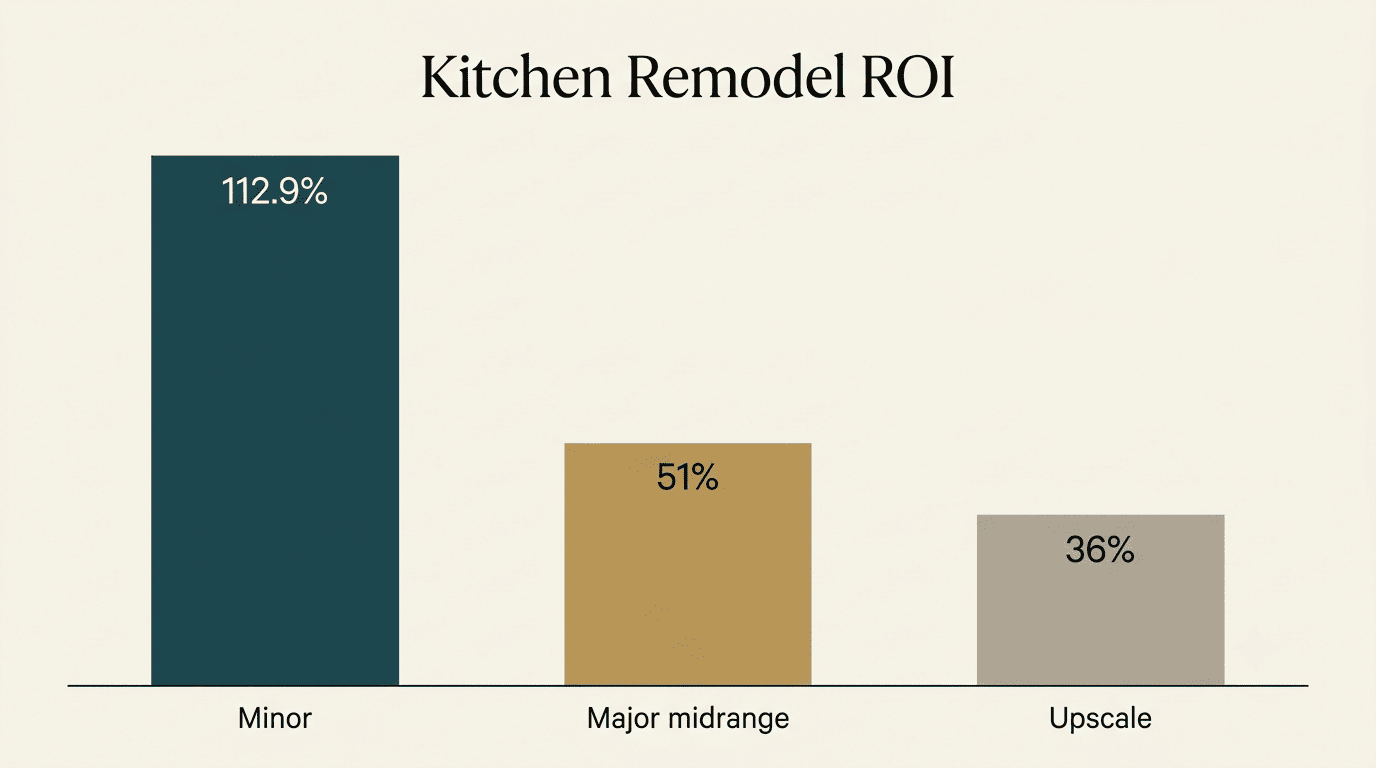
| Minor kitchen remodel | $28,000–$30,000 | 112.9% (2025 Zonda Cost vs. Value) |
| Major midrange remodel | Higher, full gut | ~51% |
| Major upscale remodel | Highest, custom | ~36% |
Average cost and range
The average kitchen remodel in the US costs around $27,000, with most projects landing between $14,500 and $42,000 depending on the kitchen’s size and the finish level chosen — cabinet-grade materials versus custom millwork, laminate versus natural stone, and so on. The specific, best-ROI minor remodel scope tracked by industry reports (cabinet refacing, countertops, appliances, and flooring together) sits just above that average, at $28,000–$30,000, since it bundles more of those categories into one project.
Minor vs major ROI
A minor kitchen remodel — new cabinet fronts, hardware, countertops, and a backsplash refresh, typically running $28,000–$30,000 — returned 112.9% of its cost at resale according to the 2025 Remodeling/Zonda Cost vs. Value report, making it the highest-ROI interior project the report tracks that year. A major midrange remodel, which usually includes a full layout change and new appliances, recoups roughly 51%, and an upscale major remodel with custom cabinetry and premium finishes lands around 36%. The pattern holds across most editions of the report: a scoped-down update consistently returns more of its cost than a full gut renovation, which is a useful number to know before choosing which AI concept to pursue.
The kitchen work triangle theory states that the three key kitchen work areas are the refrigerator, cooktop, and sink, and that an efficient kitchen layout connects them with minimal, unobstructed travel between each point.
Kitchen work triangle, Wikipedia
Homeowners planning a scoped remodel can use these figures as a budget anchor: a design concept that stays within the minor-remodel range is the one most likely to pay for itself.
Lighting and Finishing Touches
Lighting is the detail most kitchen renders get wrong if they’re rushed, because a photorealistic cabinet finish means little if the room reads as either too dim or too flat once it’s built.
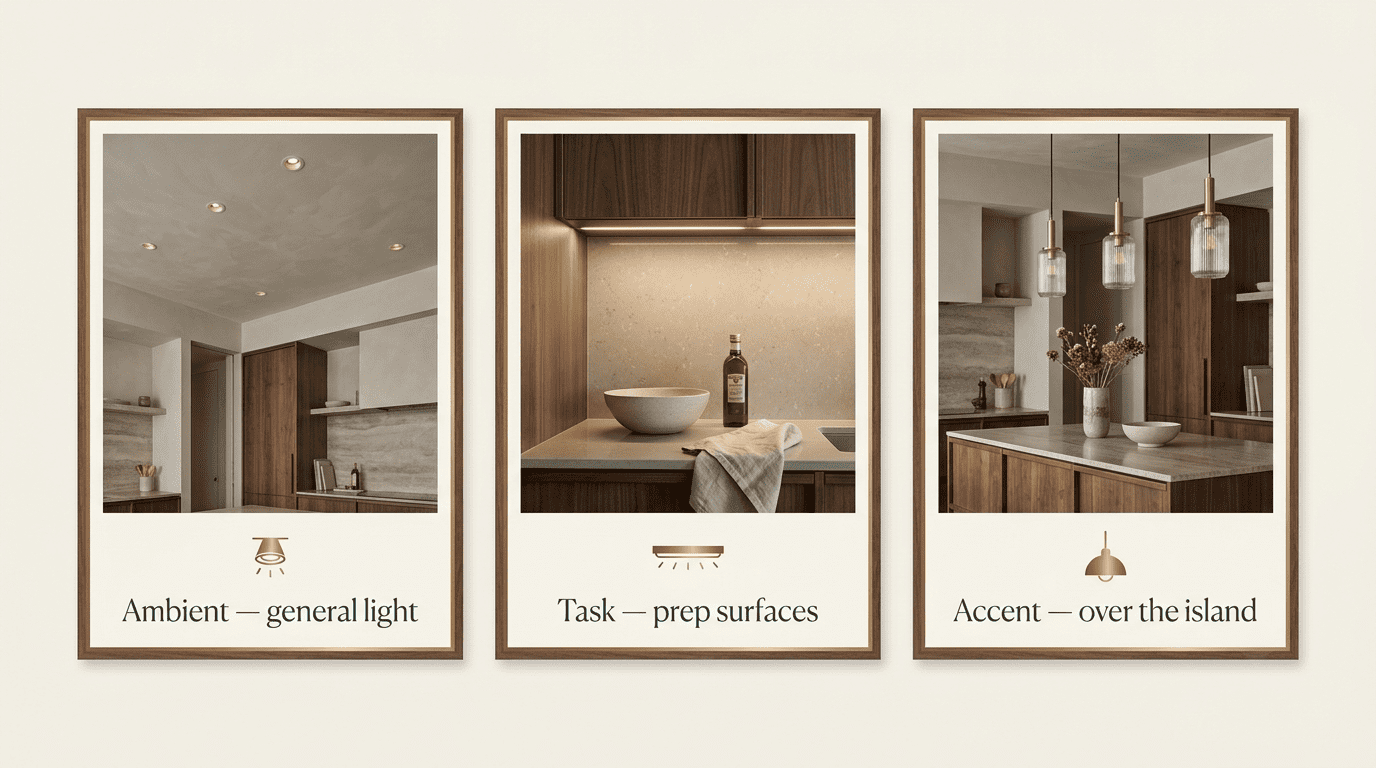
Layer the light instead of relying on one fixture. The NKBA recommends planning kitchen lighting in three distinct layers: ambient light for general illumination, task light for the work surfaces, and accent light for visual interest. Ambient lighting typically comes from recessed fixtures, with a rough guideline of one 4–6 inch recessed light per 25 square feet of ceiling area, at roughly $100–$200 per fixture installed. Task lighting is almost always LED strips mounted under the upper cabinets, aimed directly at the counter where food prep happens. Accent lighting — pendant fixtures over an island, for instance — adds character and highlights the finishes chosen earlier in the process.
Here’s how the three layers break down in practice:
| Lighting layer | Purpose | Typical fixture | Rough cost |
|---|---|---|---|
| Ambient | General room illumination | Recessed downlights, 1 per 25 sq ft | $100–$200 per fixture |
| Task | Lights the counter and prep surfaces | Under-cabinet LED strips | Varies by run length |
| Accent | Adds visual interest and depth | Pendant lights over an island | Varies by fixture style |
An AI render can show where fixtures would sit and how the room reads under warm versus cool light, but the actual fixture specs and wattage should follow NKBA’s published lighting guidelines rather than the render alone. For the appliances going into the new layout, checking the ENERGY STAR rating on refrigerators, dishwashers, and range hoods keeps long-term utility costs down without changing the design.
From AI Render to Real Kitchen
A finished AI concept is a direction, not a set of construction documents, and treating it as anything more is the fastest way to end up disappointed on demolition day.
Validate before you build
Once a render captures the style and material combination you want, the next steps move offline: precise measurements of the actual room, physical samples of the cabinet finish and countertop material held up in real light, and a written estimate from a licensed contractor. An AI home design assistant is the fastest way to get from a vague idea to a specific, shareable direction — a photo you can hand to a contractor and say «this, but confirm it’s buildable» — not a replacement for the professionals who make it real.
To move from concept to contract without missing a step, most homeowners follow roughly the same sequence:
- Upload a clear, well-lit photo of the current kitchen.
- Generate concepts across two or three styles to compare direction, not just detail.
- Narrow to one concept and note the specific cabinet color, counter material, and backsplash it uses.
- Take precise room measurements and request physical material samples.
- Get itemized quotes from at least two licensed contractors.
- Confirm any structural, plumbing, or electrical changes are code-compliant before signing.
- Lock the final material list against the original render to avoid scope creep.